Camp-let Earth sets up in 15 to 20 minutes once you know the sequence. The first time takes longer. That's expected and not a flaw in the design. The system has a specific logic to it, and learning that logic is part of owning the product. This guide walks through every stage in order, explains what you're doing and why, and flags the details that first-time users most often get wrong. Read through the full guide once before you set up for the first time. Your first setup should be at home or a low-stakes location, not at a remote campsite after a long drive.
Before You Begin
Choose your campsite position before unhitching. Camp-let Earth sets up around the trailer, so orientation matters. Position the trailer so the tailgate faces the direction you want your living area to open toward. On most sites, this means facing away from neighboring pitches and toward your view or fire.
Level ground matters more than it does for a freestanding tent. The sleeping surfaces are elevated on the trailer bed. A significant slope means an uncomfortable night. If your site is not flat, use the corner steadies and jockey wheel to compensate before you begin.
You will need a mallet for pegging. Everything else comes with the trailer.
The Setup Sequence
Stage 1: Unhitch and Stabilize the Trailer
Wind the jockey wheel down until it takes the weight of the trailer nose. Disconnect the hitch from your vehicle and the trailer electrics. Extend the corner steadies until they contact the ground and the trailer is stable.
The corner steadies stabilize and help level the trailer. They are not designed to lift it. If you need to level a sloped pitch significantly, reposition before unhitching. Once the trailer is stable and disconnected, move your vehicle clear. You will need room to work on all sides.
To ensure your Camp-let is level, place your smartphone with a leveling app on the frame, near the hitch, to ensure it is level.
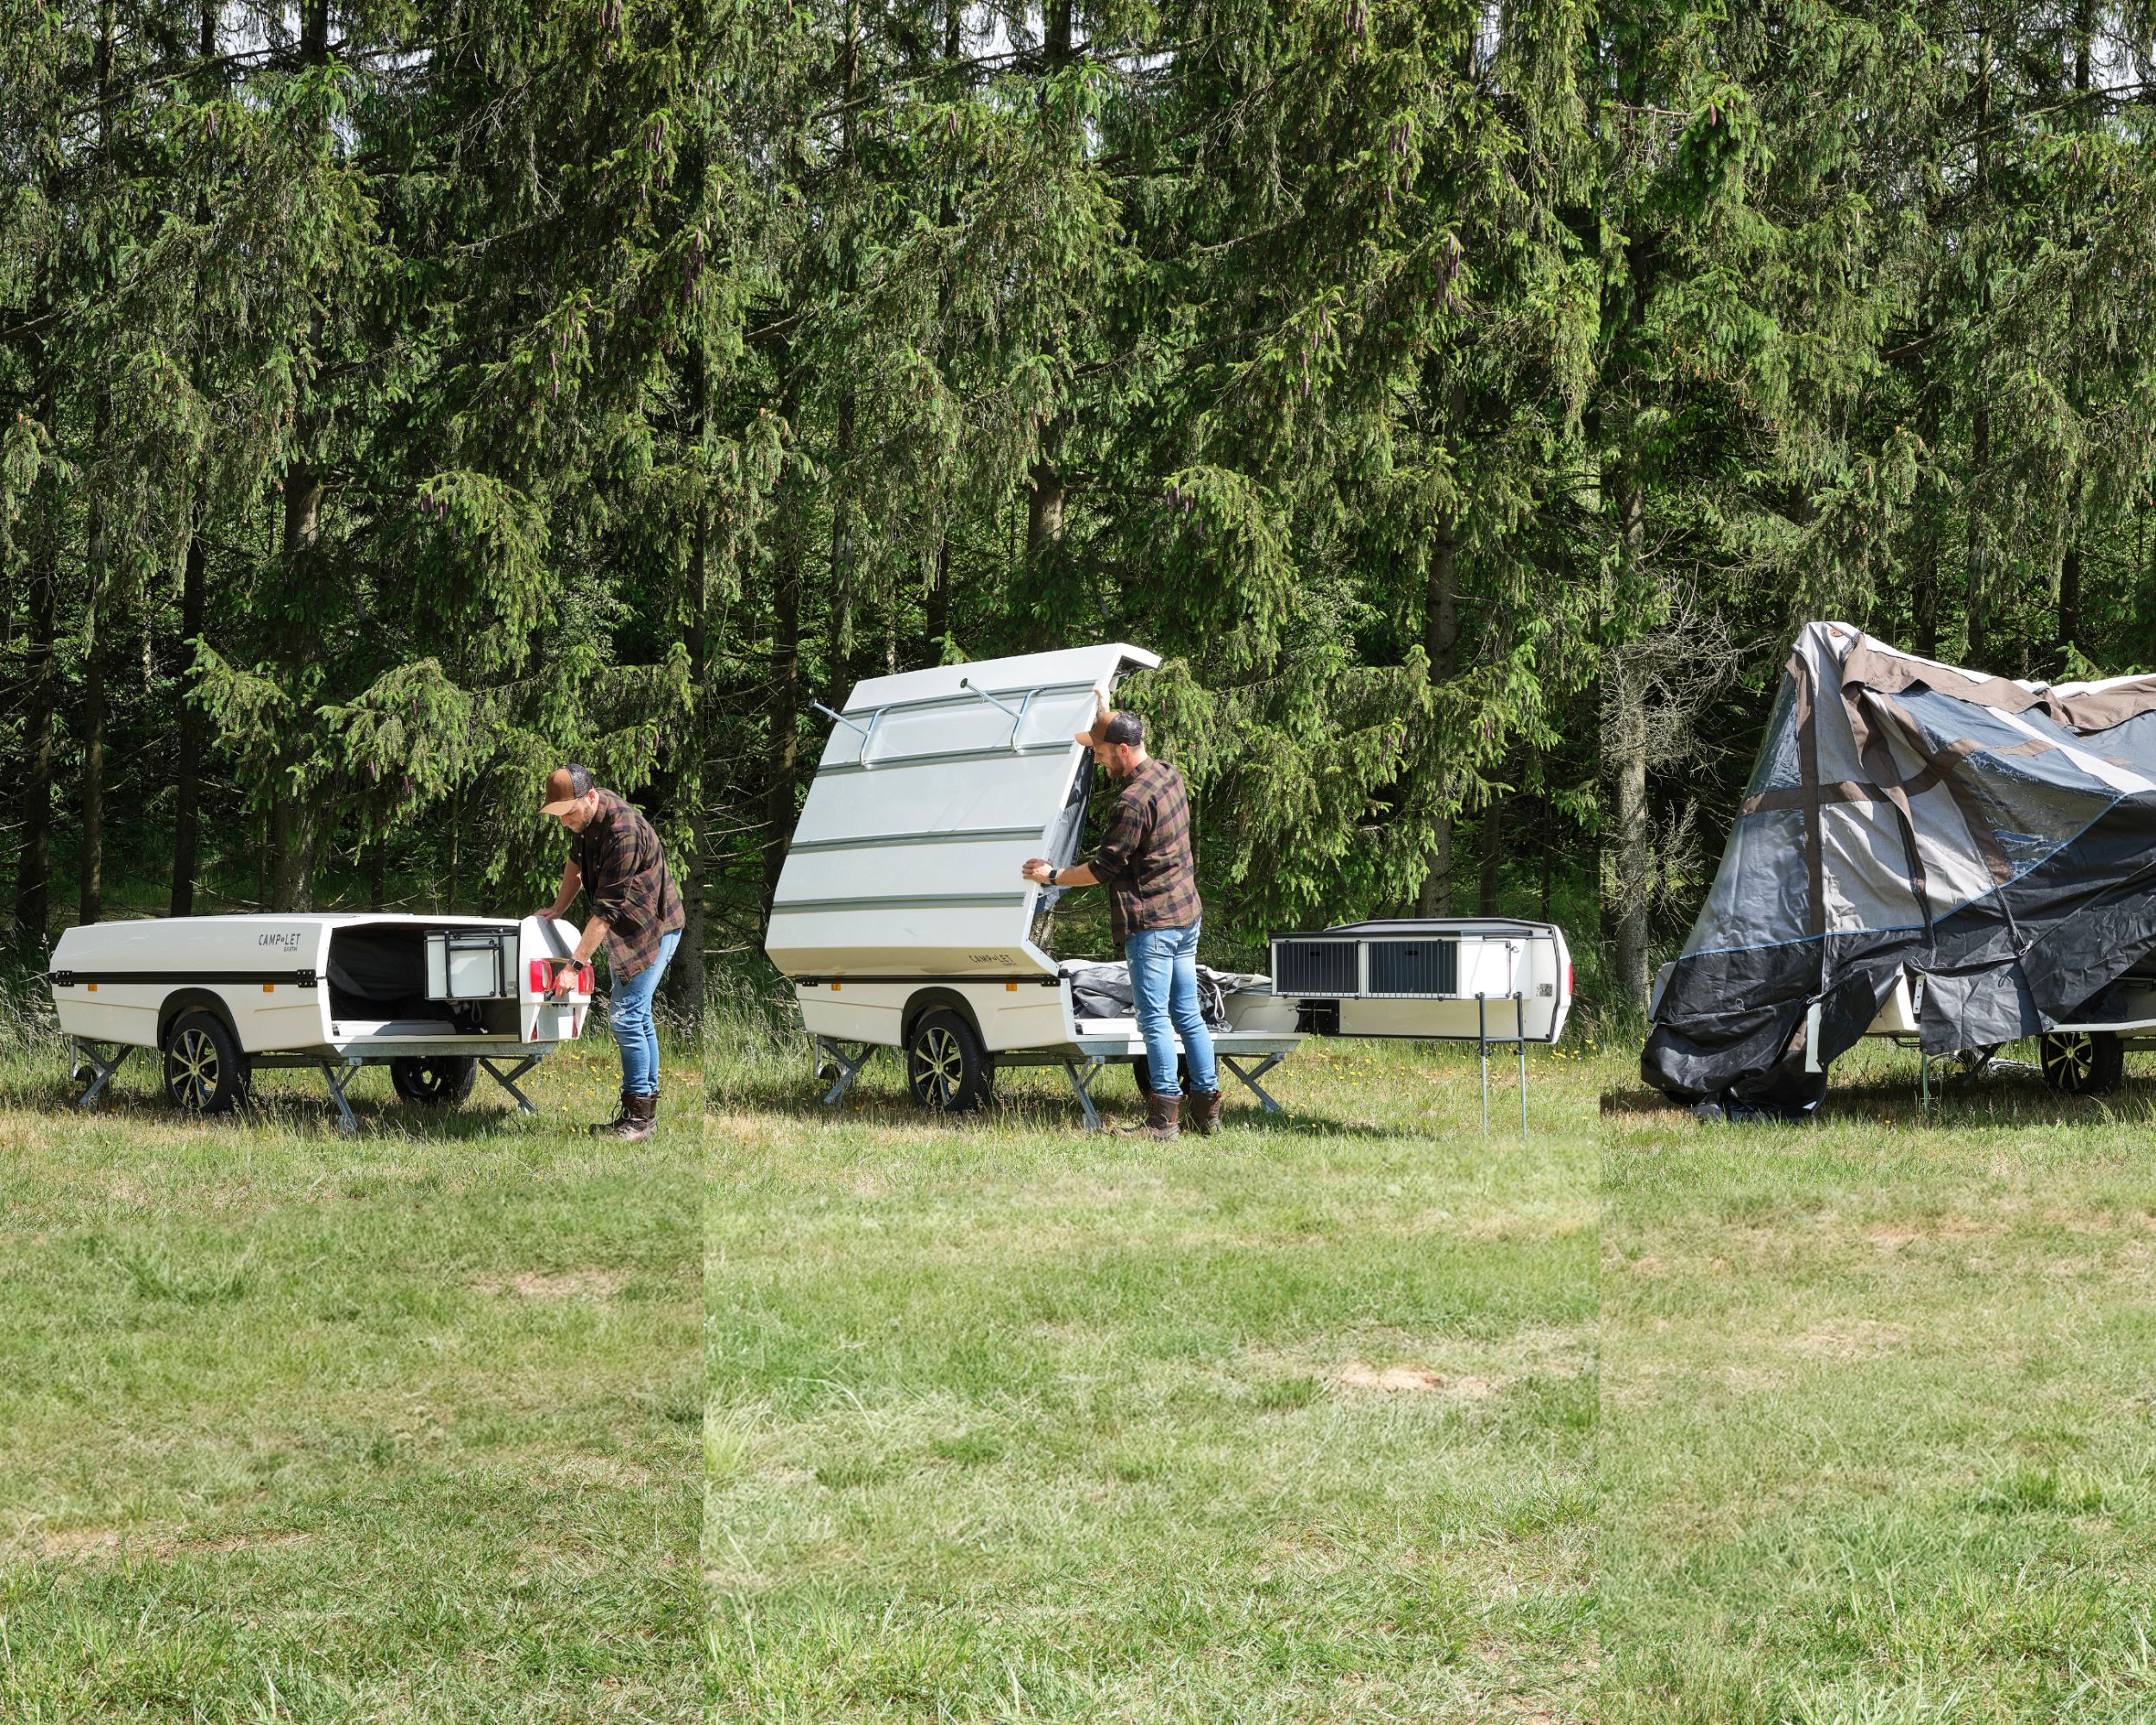
Stage 2: Open the Tailgate
Release the tailgate latch and swing the rear panel open. Fold out the tailgate legs and tighten each leg to provide stability to the tailgate. This exposes the kitchen mounting point at the rear of the trailer. If you have a kitchen package fitted, it will be accessible here. Leave the tailgate fully open.
Stage 3: Open and Prop the Lid
The lid is the hard shell that covers the trailer body during travel. It has two locking points: one on the inside near the hinge of the tailgate, and one on the outside toward the front of the trailer. Release both locks before attempting to lift.
Before opening the lid fully, locate the two support legs stored inside the trailer. These insert into the cargo rail channels on the top of the lid. Place one leg toward the front and one toward the rear of the lid. Now you are ready to lift the top shell and open the Camp-let.
With the lid open and supported, the canvas system and frame components inside the trailer are now accessible.
Stage 4: Swing the Canvas Forward
The canvas is stored inside the trailer body. Before pulling it forward, locate and attach the front crossbar to the frontmost frame of the tent. This crossbar is the structural connection that allows the canvas to hinge upward and deploy forward into the living space. Without it in place, the canvas cannot be pulled up and forward correctly. Do not skip this step.
With the crossbar attached, stand at the front of the Camp-let, near the sleeping cabins. Prop your foot on the Camp-let, or stand on it entirely, grab the canvas and pull the entire frame forward. The canvas is attached to the trailer and does not detach. You are unfolding it forward up and over your tailgate, bringing the packed sleeping cabins with it.
If the canvas feels stuck, check that all storage clips and straps inside the trailer body are fully released. One missed clip is enough to create significant resistance.
Stage 5: Attach the PVC Cargo Skirt
The PVC cargo skirt is a fabric panel that attaches to the base of the trailer just in front of the sleeping cabins. It covers the gap between the underside of the trailer and the ground, closing off the storage compartment that runs beneath the sleeping area.
Attach the skirt using the snap connections along the base of the trailer frame. Work across the full width, connecting each snap before moving to the next. The skirt should lie flat and cover the gap evenly.
This step is not required for a single overnight stop on dry ground. For any stay longer than one night, or any conditions where weather or insects are a concern, attaching the cargo skirt is recommended. It also creates the lower connection point for the groundsheet, which is covered in Stage 7.
Stage 6: Raise the Front Uprights
The two front upright poles slot into the frame at the front corners of the living area. The crossbar from Stage 4 is already in position. Insert each pole into its receiver at the base, then click the top into the frame connection. Give each pole a firm upward push after clicking to confirm it is seated.
With both uprights raised, the front of the living area begins to take shape. The canvas should be lifting forward with the frame. If it is pulling unevenly, check that the canvas is not snagged at any point along the trailer body.
Stage 7: Lay Out the Groundsheet (Optional, Recommended)
The groundsheet is not included as standard with Camp-let Earth but is recommended for regular use. It is a purpose-made PVC floor panel sized specifically for the living area. It lays flat on the ground in the living space in front of the sleeping cabins.
The groundsheet has rounded corners and a raised lip running around its full perimeter, standing approximately four inches tall. This lip is designed to hold back rain that runs along the ground and to prevent insects from entering under the canvas edge.
On the outside of the lip, velcro runs along the full perimeter. This connects to corresponding velcro on the inner base of the living area canvas and on the outer face of the PVC cargo skirt from Stage 5. Work around the full perimeter, pressing the velcro connections firmly to create a continuous seal at ground level. This seal keeps rain, drafts, and insects out at the base of the structure.
If you are camping without the groundsheet, the cargo skirt from Stage 5 still closes the gap at the trailer base. The groundsheet adds a defined floor surface and the sealed perimeter for longer stays or more demanding conditions.
Stage 8: Thread the Roof Pole and Connect the Ridge
The center roof pole runs along the peak of the living area. Thread the pole through the roof sleeve in the canvas. Once threaded, connect each end to the frame using the hook fittings at the green cord markers.
The roof pole creates the 7.4-foot peak at the center of the living area. Once both ends are connected, the living space has its full standing height. This is the stage where the structure starts to look like a complete shelter.
Stage 9: Extend the Side Poles
The side poles support the canvas walls of the living area on both sides of the trailer. Set the foot plate at the base of each pole onto the ground, extend the pole to height using the adjustment clamp, and lock it in place. The T-bar cross piece at the top of each side pole connects to the canvas roof at the side seam.
Side pole height affects canvas wall tension. Set them high enough that the canvas is taut but not strained. You will fine-tune tension at the pegging stage. Aim for a consistent height on both sides before moving on.
Stage 10: Secure the Rear Canvas and Sleeping Cabin Connections
Move to the rear of the trailer. The sleeping cabin canvas attaches to the trailer body at the rear via zip closures on the sleeping cabin walls and snap connections along the base of the canvas. Close the rear zips on both sleeping cabin panels, then work along the base connecting each snap to its point on the trailer frame.
The sleeping cabins are now enclosed. The canvas should be pulled taut from rear to front. Significant slack in the sleeping cabin roofs usually means a rear snap connection is not fully engaged.
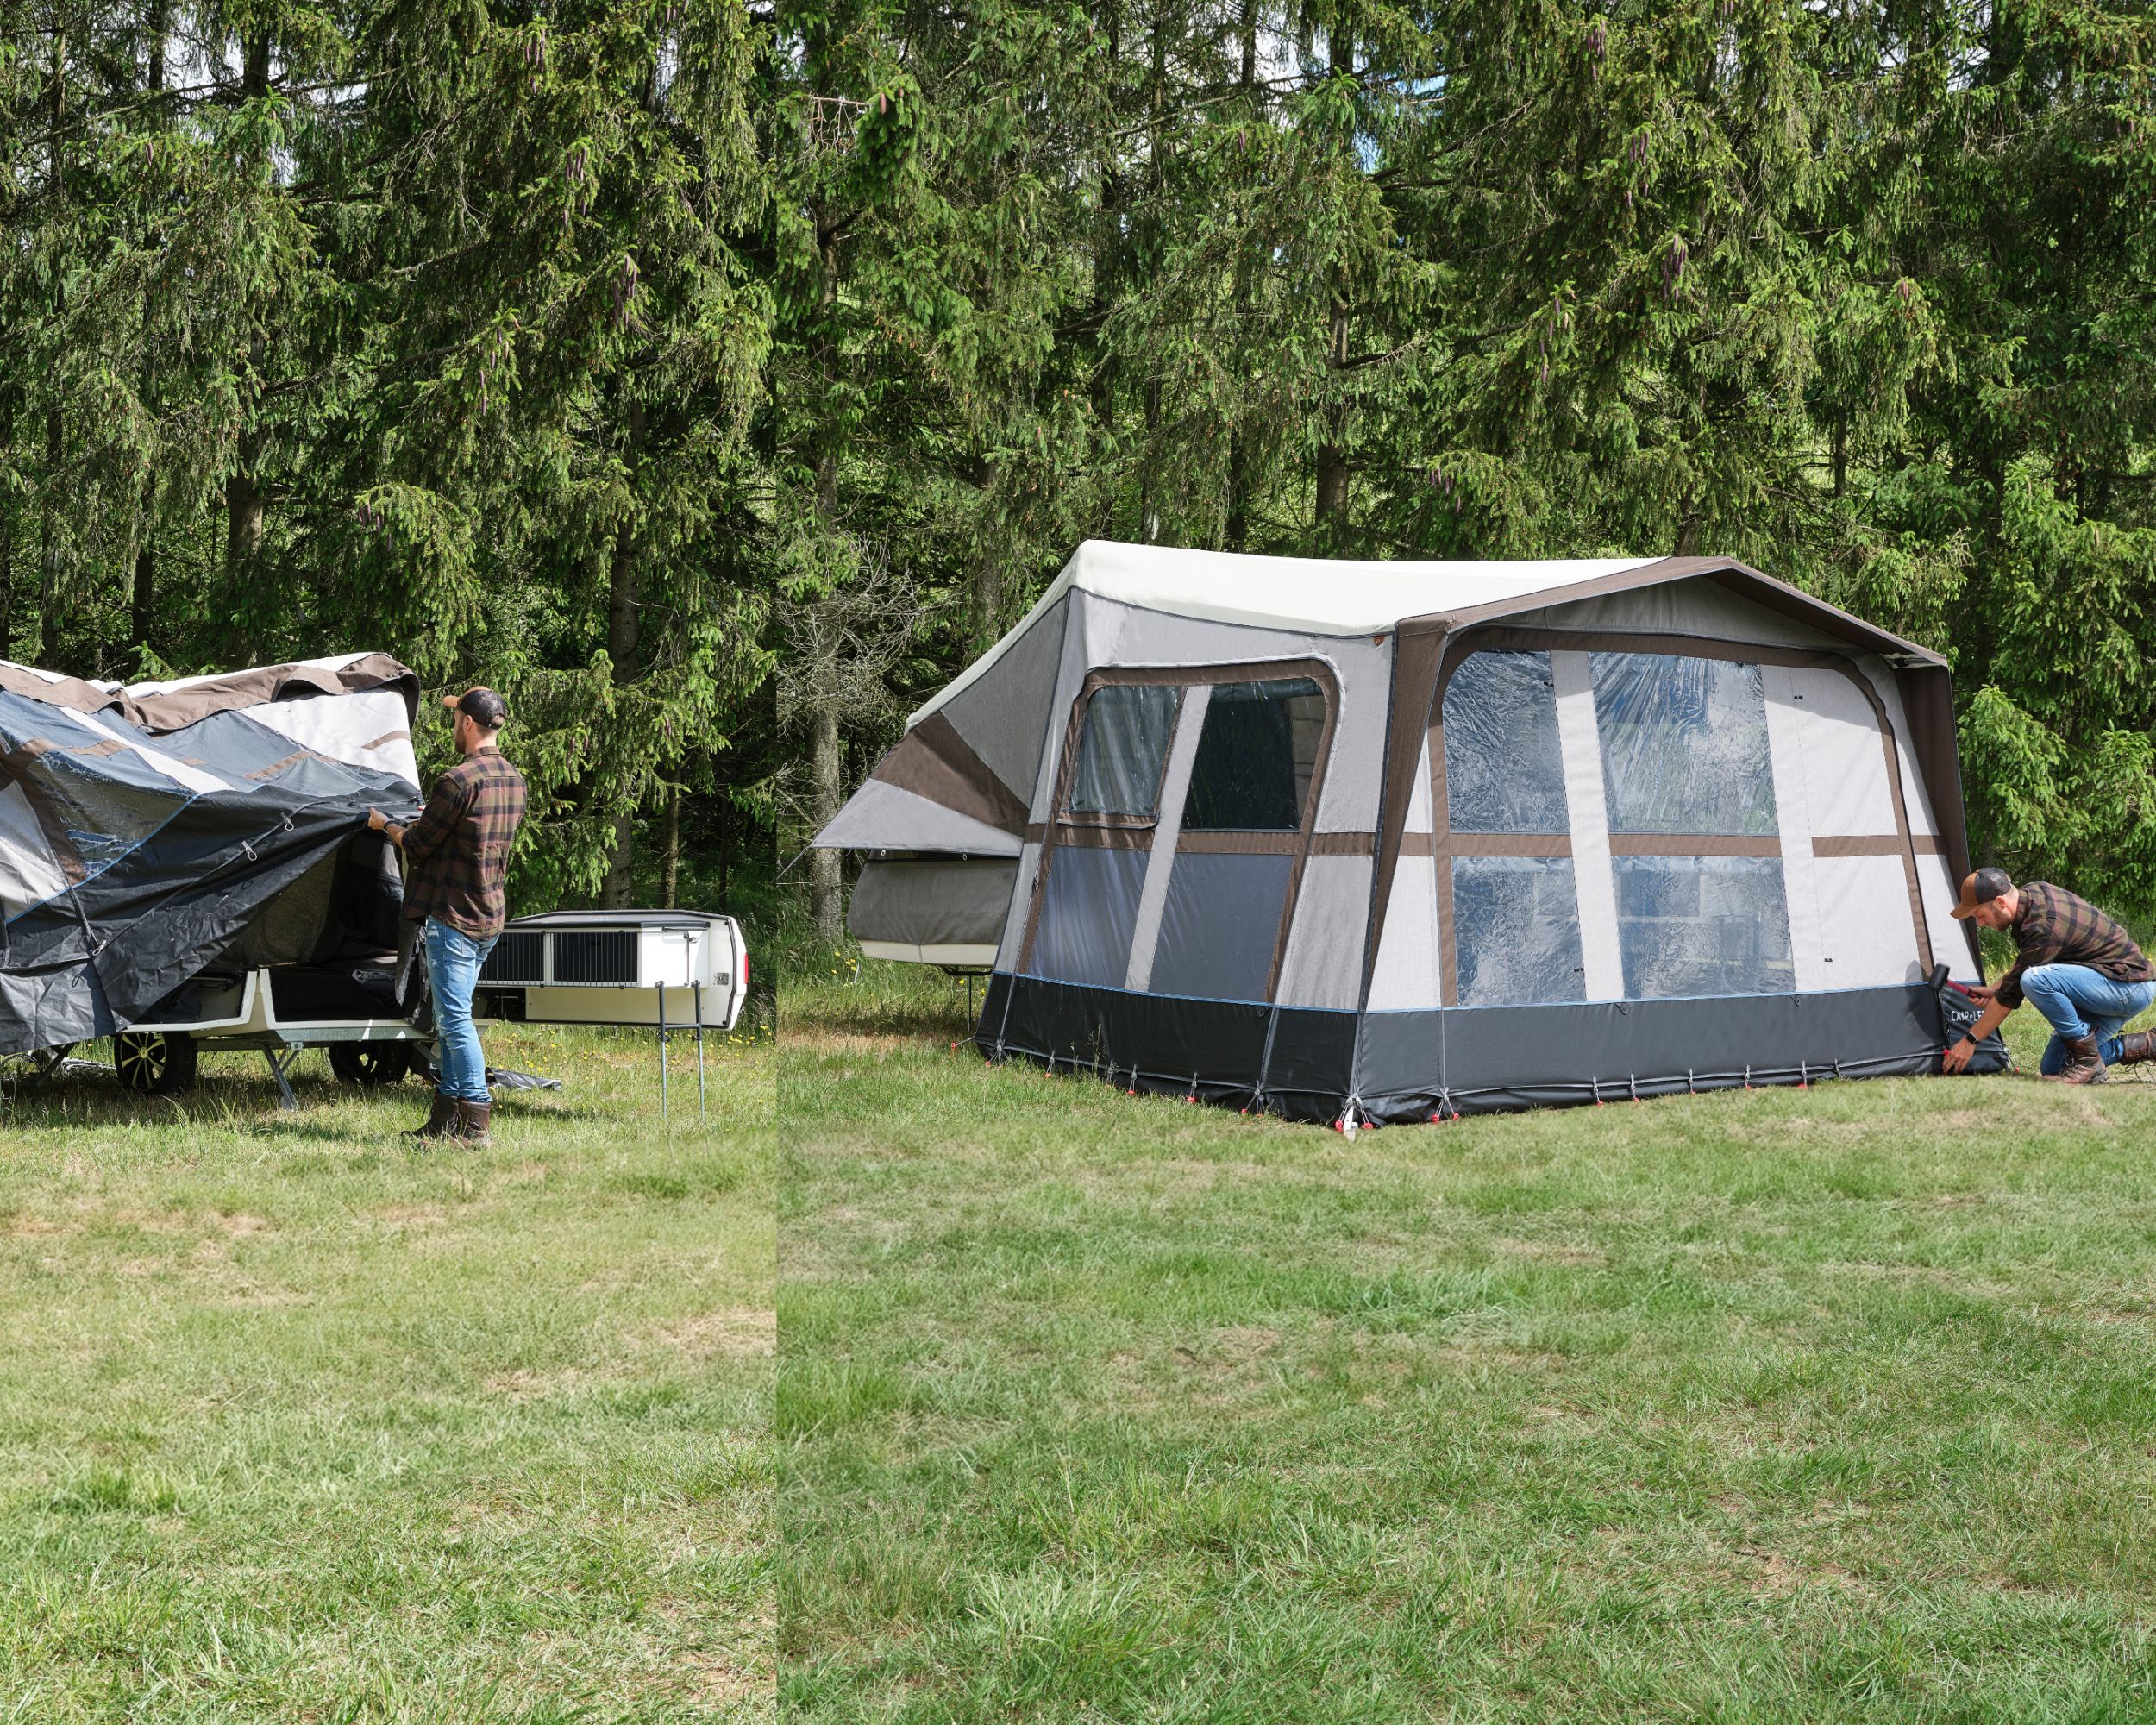
Stage 11: Peg the Tent and Set Final Tension
Peg points run around the outer perimeter of the tent canvas at ground level. Peg the rears first, then work your way towards the front of the Camp-let. Angle each peg slightly away from the tent rather than straight down for maximum hold. On hard ground, use the peg heel to open the entry point before driving fully.
Once all pegs are in, step back and assess canvas tension across the full structure. The roof should be taut with no significant sag between front and rear. The side walls should be upright with no inward pull. The front face should hang flat.
If the roof sags at the center, adjust the front frame height upward. If the side walls pull inward, increase side pole height. Both adjustments can be made without un-pegging. Adjust the pole or frame first, then check tension again before moving on.
Setup is complete. The structure is stable and weatherproof.
Common First-Time Issues
The lid won't open. Both locking points need to be released before lifting. The interior lock near the tailgate hinge is easy to miss on the first attempt. Check both before pulling.
The canvas won't swing forward. All storage clips and straps inside the trailer body need to be released. There are usually two to three points. One missed clip is enough to prevent the canvas from moving.
The front panel zip doesn't close cleanly. Confirm the crossbar from Stage 4 is correctly positioned. A misaligned crossbar distorts the front face geometry and prevents a clean zip closure.
The sleeping cabin roofs are slack. Check the rear canvas snap connections from Stage 10. One disconnected snap is usually the cause.
The groundsheet lip won't stay connected. Make sure the cargo skirt from Stage 5 is fully snapped and lying flat before attempting the velcro connection. The two surfaces need to meet cleanly for the velcro to hold along the full run.
Packing Down
Pack-down is the setup sequence in reverse, from Stage 11 back to Stage 1. Pull all pegs before releasing any frame connections. Release frame connections before folding the canvas. Fold the canvas before swinging it back into the trailer body.
Never pack a wet canvas without drying it first. If you pack down in rain, open and air the canvas fully before your next trip. Isacryl will not mold quickly, but prolonged damp storage will eventually cause problems. For more on canvas care, see the Caring for Isacryl Fabric guide.
Pack-down from a dry, organized camp typically takes 20 to 30 minutes. The process rewards a consistent sequence over speed.
Setup in Wind
The canvas catches air when it is partially erected and not yet under tension. A second person makes wind setup significantly easier. If setting up solo in wind, orient the trailer so the tailgate faces into the wind. This reduces exposed canvas during the critical Stages 4 through 8.
Once fully pegged and tensioned, Camp-let Earth handles wind well. The Isacryl canvas is designed for European conditions, which includes sustained wind. The structure's integrity once correctly set up and pegged is not a concern.
What to Expect on Your First Few Trips
Your first setup will likely take 45 minutes to an hour. That is not a problem with the product. You are learning an 11-stage sequence for the first time, and some fittings need to be found and understood before they can be operated quickly.
By the second or third trip, the sequence becomes familiar. Most owners reach consistent 15 to 20 minute setups after four or five uses. The transition from slow to fast is not gradual. There is a point where the sequence clicks as a whole, and after that it stops feeling like work.
Setup guides for accessory additions, including the Sun Canopy, Side Tent, Annex and Awning, are covered separately. Get comfortable with the base setup before adding accessories. Each accessory builds on the base structure and has its own short sequence.


